Virtual Computer – Manage Your Business Data Anywhere | TallyPrime Powered by AWS

SHARE

 Nov-30-2021

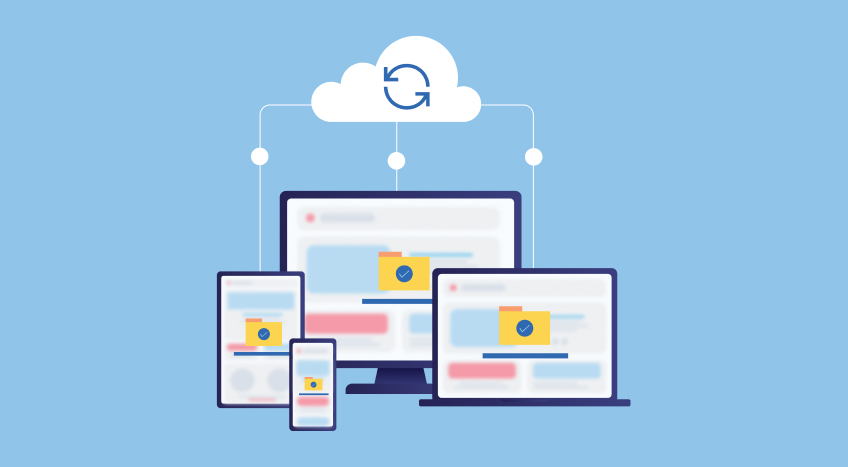
Access to business data on the move enables you to keep your data up-to-date and reliable. You may need to refer to your company data when you are away from your work location. Similarly, your business may require multiple users to update the same data. To meet such requirements, you will need to host your data and application in a location that is easily accessible from anywhere, anytime.

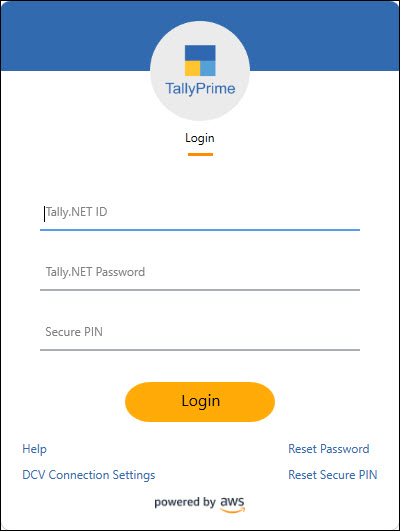
Manage your business on the go safely by connecting to a virtual computer through the Virtual Computer Connection client and also through the web browser from the Self Service portal that are available on the AWS infrastructure. Both the client and the Self Service portal enable you to use any local computer to connect to a virtual computer and use the TallyPrime application for your business. 

Access your business data anywhere – Whether you are traveling or at a customer’s place, you can access company data from anywhere by connecting to a virtual computer. You can either install the client onto a local computer and then log in or use the Self Service portal to connect to the virtual computer via a web browser for accessing the TallyPrime application and data.

Virtual computer – By default, the virtual computer comes with all basic setup like pre-installed TallyPrime application, a set of pre – organised folders for your data and files, and other features that you might need to run your day-to-day work seamlessly.

Get started with TallyPrime on Virtual Computer – Connect to the virtual computer and access TallyPrime on the move. Setting up your TallyPrime license is a one-time activity. If you are a new user, activate your license. If you are an existing user, surrender your license from the local computer and reactivate the same on the virtual computer. Get started by creating your company in TallyPrime and record your transactions. Do you already have your company data locally? No worries! Upload TallyPrime or Tally.ERP 9 data on the computer in a few simple steps, access it using TallyPrime, and you are all set!

Troubleshoot and access other capabilities – While using the virtual computer, you can use common features like instantly capturing a screenshot, viewing notifications, or performing common troubleshooting activities. Additionally, restart the computer when you need, run the data repair process or even shutdown TallyPrime application, each of these with the click of an option from the Start menu.

Prerequisites to Access Virtual Computer

To be able to access and work on your virtual computer, you will require the following:

  • Virtual Computer Connection client installed. For more details, refer to the Virtual Computer Connection topic. 
  • Supported browsers across all major desktop operating systems (Windows, macOS, and Linux). For more details on connecting to the virtual computer through the Self Service portal refer to the Self Service Portal topic.
  • A user account with valid credentials to login to the virtual computer.
  • Internet connectivity.

Know Your Virtual Computer

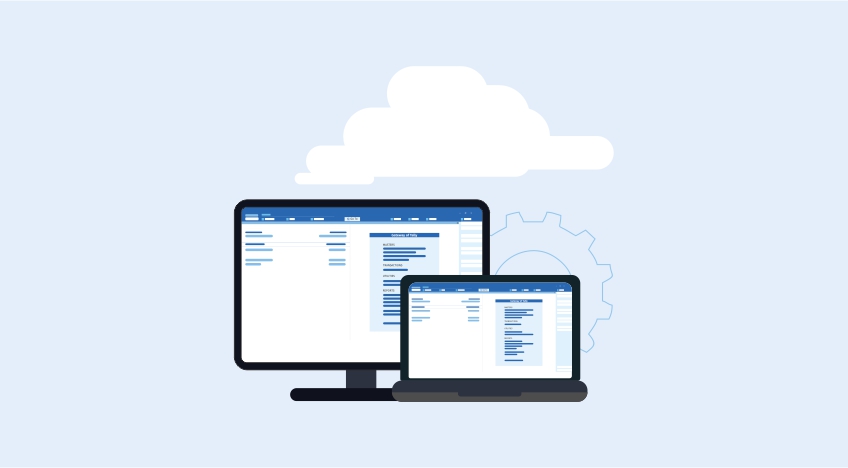
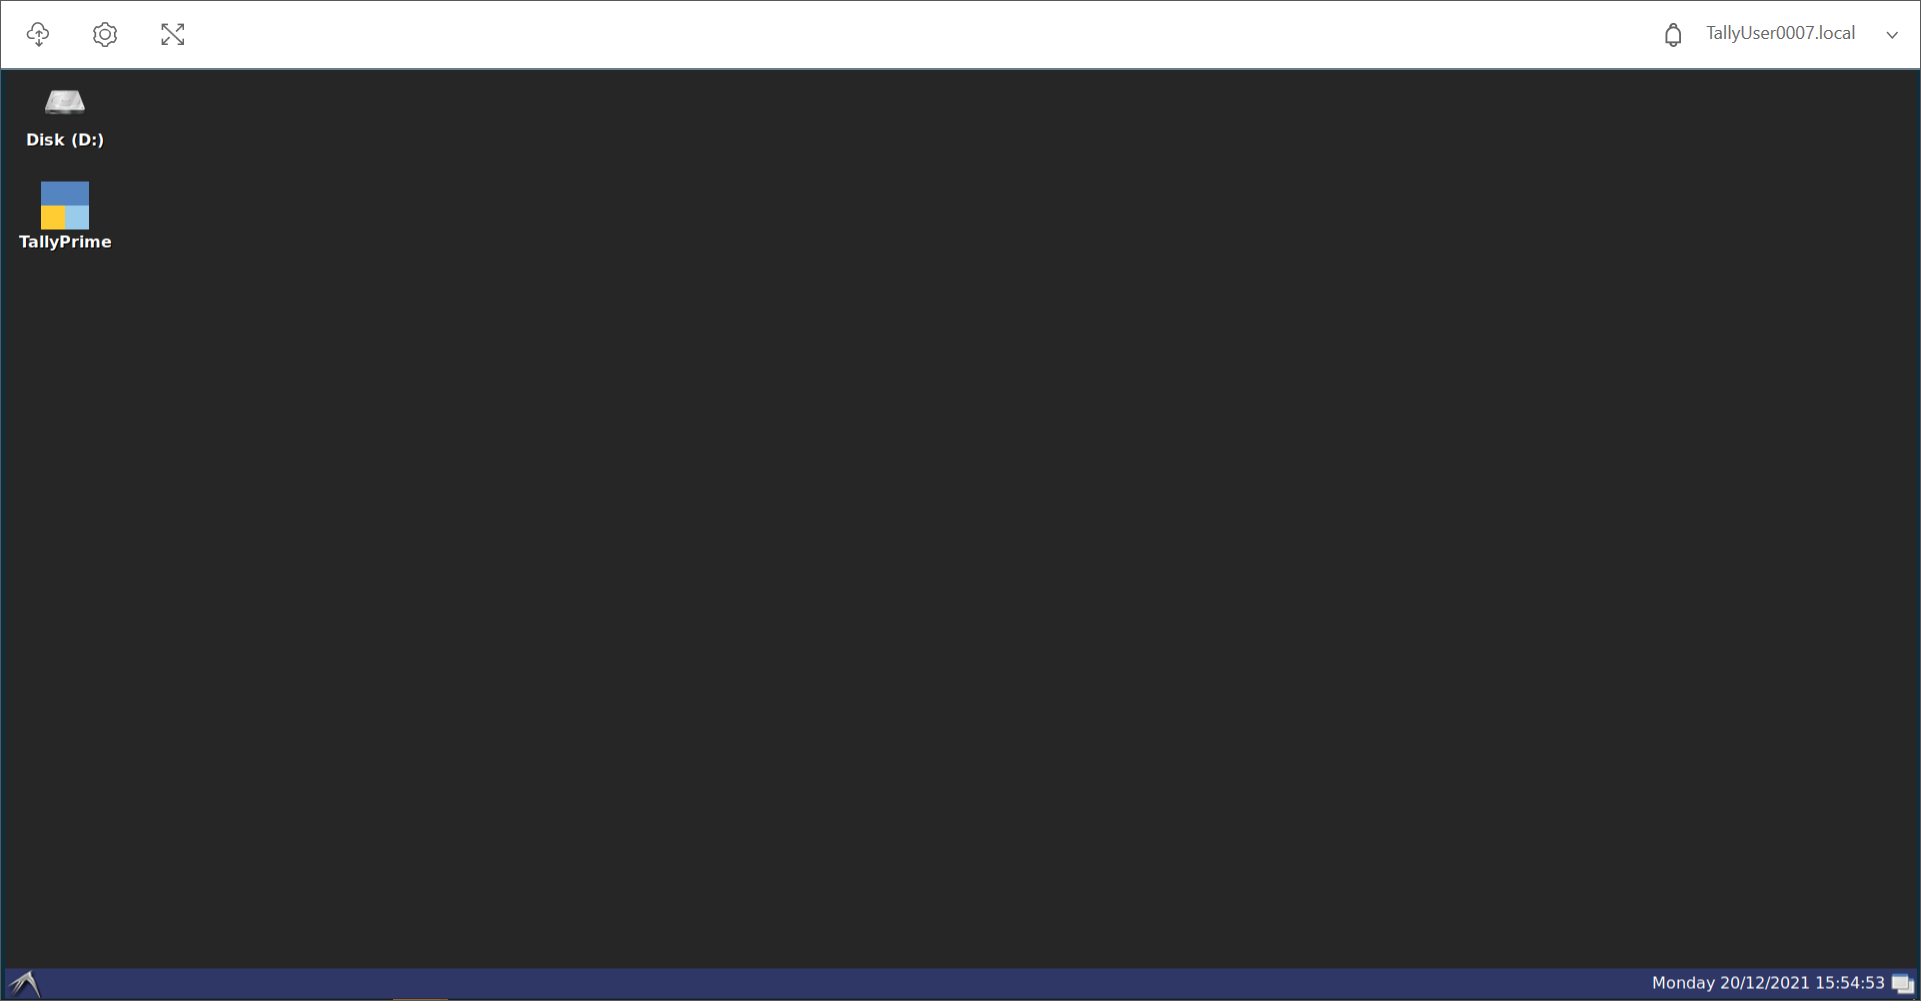
Your virtual computer looks similar to any local computer, with TallyPrime preinstalled. A sample image is shown below:

It has the following components:

  • The options on the top-left corner are a set of functions like storage, settings, and so on that enables you to effectively use the virtual computer.
  • The options on the top-right corner include a notification button and the computer name.
    • The notification button keeps a track of activities, such as restart, backup, and so on.
    • The computer name is associated with a few options related to your virtual connection.
  • The desktop displays shortcuts to the TallyPrime application and D:\ drive that contains a set of pre-organised folders for your use.
  • The Start menu at the bottom-left corner helps you to troubleshoot your application, if needed, and maintain the computer.

Folder Structure & Setup

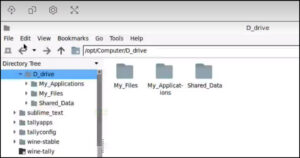
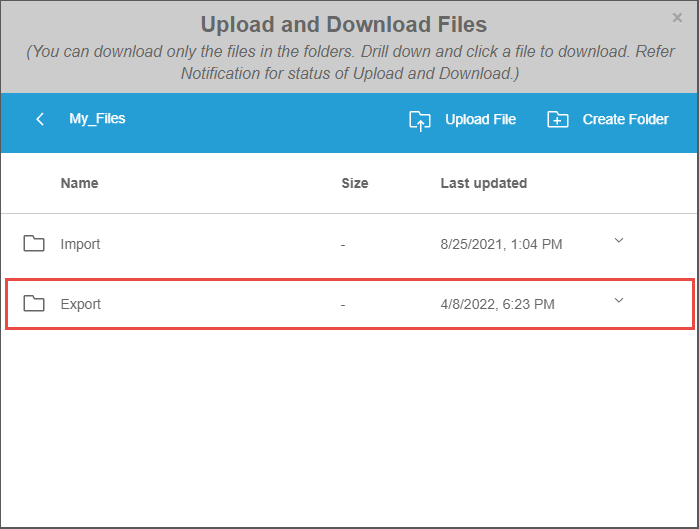
The virtual computer comes with a few pre-defined folders where you can keep your data and applications, in an organised manner. However, there is no restrictions on using the folders the way you want or creating new sub-folders. A sample image is shown below:

  • My_Applications – The folder where TallyPrime and TallyPrime Server are pre-installed.
  • My_Files – You can keep your personal files in this folder. Additionally, if you use the Export or Import features in TallyPrime, the folder path is set to this folder, by default.
  • Shared_Data – Keep files that you want to share with other users, if multiple users are associated with your account. The folder is further classified into the following sub-folders.
    • Backup – To keep backup of your company data.
    • Files – To store any other files for common reference.
    • Data – To store your company data.
  • TPS_Data – In case you have access to TallyPrime Server on your virtual machine, this folder stores the application and data for TallyPrime Server.

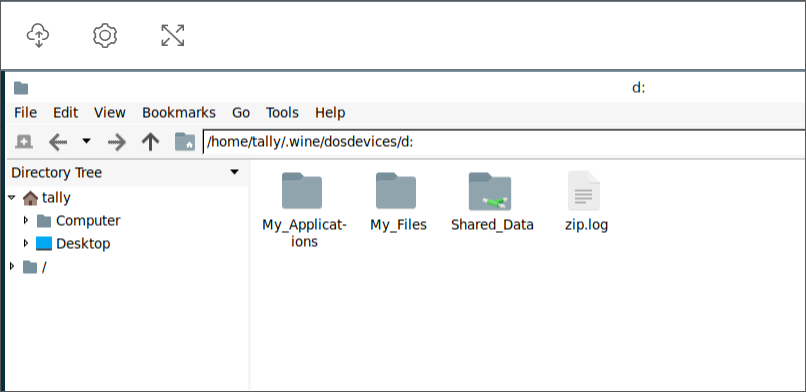
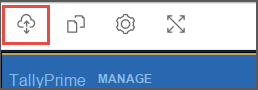
Using the Storage icon that appears on the top-left corner of the virtual computer, you can upload files and folders from your local computer to any of these folders.

Note: Be assured that uploading your business-critical data will be safe at a storage location attached to your virtual computer. You can also create new folders under any of these folders, if needed, and save your files in the new folder. However, any data stored other than these folders will get removed the next time you start the virtual computer. 

Share Data on Virtual Computer

TallyPrime on Virtual Computer has the flexibility to access the TallyPrime application from anywhere. All users of your Virtual Office would generally have access to the folders on the Virtual Computer. However, there may be situations that you as the Owner or Administrator have stored business-critical data inside the Shared_Data folder and you want to completely restrict other users from accessing such information. In some cases, you may have data that is required for data entry or your day-to-day business transactions and you want users to access such data only when they connect to the company through TallyPrime on the Virtual Computer. You now have the flexibility to set permissions for all such cases so that your data remains secure through authorised access.

Types of Permissions for Folder Access

As an Owner or Administrator, you can set the following permissions for the standard users in TallyPrime on AWS. Let’s consider Shared_Data folder for illustration purpose.

  • Allowed: Full access to the Shared_Data folder and ability to download the files from that folder to your local computer.
  • Disallowed: Completely restricts users from accessing or downloading files from the Virtual Computer.
  • Allowed in TallyPrime: Access to the Shared_Data folder only through TallyPrime on Virtual Computer. Users with this access cannot access the folder through File Explorer or download any files from the Virtual Computer.

You can set the permissions for the Shared_Data folder and any subfolder created under it. However, the permission you set for the parent folder Shared_Data takes prominence. Let’s consider a few scenarios to understand the impact of setting permissions in a folder hierarchy. Say, under the Shared_Data folder, you have created two subfolders named Data_HO and Data_BLR.

Shared_Data

(Parent Folder)

Data_HO

(Subfolder)

Data_BLR

(Subfolder)

Description
Allowed Allowed Disallowed In this case, the user can access Shared_Data and Data_HO, but cannot access Data_BLR.
Disallowed Allowed in TallyPrime Allowed

As you have set the parent folder with Disallowed access, the user will not be able to access or download the data from Data_HO and Data_BLR even if the access is set to Allowed in TallyPrime and Allowed, respectively.

Allowed in TallyPrime Allowed in TallyPrime Disallowed  The user can access Shared_Data and Data_HO through the TallyPrime application but cannot access Data_BLR.

In addition:

  • If you create a new folder under a parent folder with permission, the new folder inherits the parent folder’s permission.
  • When you copy a folder with permission and paste it under a parent folder at a different location, the copied folder inherits the parent folder’s permission at that location.
  • If you cut and paste or move a folder with permission to a different location, that folder retains the existing permission.

Set Permissions | User Access to Data Folder 

Standard Users

  1. Under D: drive, right-click the Shared_Data folder or select a subfolder under it, as per your requirement.
    For illustration purpose, we have considered Shared_Data > Data as the folder path.


  2. Right-click the Data folder and click Set Permissions.

    The Manage Access screen appears with the following default details:
    • User: This is set as Standard User, which you can neither edit nor delete.
    • Access: This is set as Allowed.
    • Folder Path: This is set to the folder that you had selected to set permissions for the users.
  3. Select the required access for the Standard User, for example Allowed in TallyPrime.
    For details about permissions, refer to the Types of Permissions for Folder Access section. 
    You can alter the permissions as needed for the Standard User. However, you cannot remove Standard User from the User list.

Access for a specific user 

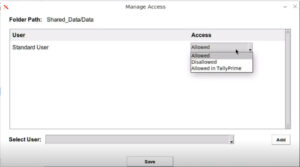
Say you have set Allowed in TallyPrime or Disallowed access for the Standard User. There are situations when you may want a specific user among the Standard User group to be able to access the folder completely, without any restrictions. In this case you can add that user and select the required Access. 

In the Manage Access screen

  1. From the Select User drop-down list, select the user, and click Add.
  2. From the Access drop down list, select the required permission, and click Save.
    Note that unlike Standard User, you can remove this user from the User list whenever you no longer want to set any access for that user.

Error Notifications

The following errors may appear for users with Allowed in TallyPrime or Disallowed permission: 

  • Accessing the folder from File Explorer: Error Opening Directory
  • Download files from the virtual computer: Failed to list files (The operation failed)

Screen Resolution, Screenshots, & Troubleshooting

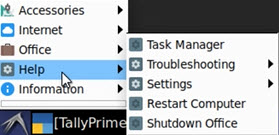
To manage your virtual computer better, you can use the following features as needed:

  • Set up the screen resolution
  • View screens in full-screen mode
  • Capture any screenshots

Additionally, the following troubleshooting operations are readily available from the Start menu of your virtual computer:

  • Repair company data
  • Restart virtual computer
  • Quit TallyPrime application

DCV: At times, you may want to know certain details about your virtual computer, such as the operating system of the client and server, or similar information.

  • Click the computer name, appearing on the top-right corner, and click About DCV.

Get Started with TallyPrime on Virtual Computer

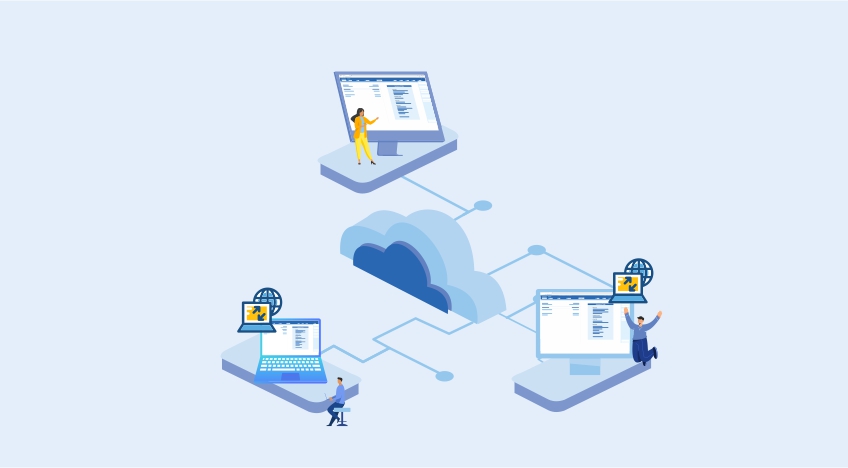
The virtual computer provides you a seamless experience of maintaining your business transactions using the TallyPrime application. Connect to the computer and activate or reactivate your license on TallyPrime, which is a one-time activity. Once you activate/reactivate the license, you can use TallyPrime for your business needs. You can organise your data and other files, as per your convenience.

Connect to virtual computer

You can connect to one or more virtual computers through the Virtual Computer Connection client from your local computer. To know how to install the Virtual Computer Connection, refer to the Virtual Computer Connection topic. 

Alternatively, you can also access the virtual computer through a web browser from the Self Service portal without having to install a client on your system and use TallyPrime. For more information about connecting to the virtual computer through the portal, refer to the Self Service Portal topic.

  1. Login to the client with your user credentials – Tally.NET ID, Password, and Secure PIN.

  2. Connect to the computer assigned to your account.
    1. Tally.NET ID with a single computer: Logging into the client opens the virtual computer directly, for your convenience.
    2. Tally.NET ID with multiple computers: You can connect and start one or more computers, as you need.

For more information, refer to the Virtual Computer Connection topic.

Disconnect your computer using the client or close the virtual computer window, when you are away. If your virtual computer is idle for 45 minutes due to inactivity, it will automatically disconnect. You can connect back and continue with your work when required.

One-time setup for new users of TallyPrime

Once you connect to the virtual computer for your account, activate your license on TallyPrime, create a company, and get started. 

  1. Open TallyPrime from the desktop or the My_Applications folder of the virtual computer.
  2. Select Activate New License and provide your license details to activate your license.
  3. On the Select Company screen, select Create Company > enter your company details.
    For more information, refer to Set Up Your Company in TallyPrime

To know more about TallyPrime and its features, refer to the following topics:

To know more about TallyPrime Server and its features, refer to:

One-time setup for existing users of TallyPrime

To start using TallyPrime, you will need to surrender your license on the local computer and reactive the same on the virtual computer. 

  1. Open TallyPrime from the desktop or the My_Applications folder of the virtual computer.
  2. Select Reactivate Existing License and provide your license details. 
    Ensure that you have already surrendered the existing license on your local computer. 
  3. Upload the company data from your local computer to the virtual computer.
    1. On the top-left corner of the computer, click the Storage icon.
      The Files Storage window opens.
    2. Select the folder where you need to upload your company data. 
      Alternatively, click Add Folder > enter a folder name > press Enter.
    3. Click Upload File > select the file and press Enter.
      • To upload the entire company data folder, ensure to create a zip file of the folder in your local computer and select the zip file for uploading. You will need to unzip the file on the virtual computer before using the company data.
      • If you upload a backup file of the company data, restore the backed-up file using TallyPrime on the virtual computer. Press Alt+Y (Data) > Restore
Note: If you have uploaded TallyPrime data, you can use the data as is. However, if you have uploaded Tally.ERP 9 data, you will need to migrate the data to TallyPrime. For more information, refer to Data Migration.

To know more about licensing in TallyPrime, refer to the Licensing Activities topic.

Migrate Your Company Data to TallyPrime Release 3.0 BETA

TallyPrime Release 3.0 comes with a host of features for you to meet your specific business requirements. You can seamlessly migrate your existing content to the latest release of TallyPrime.

For a seamless migration experience, refer to the Recommendations before Data Migration

You can migrate your company data in any of the following ways:

Migrate data using virtual computer

  1. Ensure the following prerequisites:
    1. Use the Skip Shutdown feature to ensure all mandatory shutdowns are skipped until completion of migration. Migrating to TallyPrime Release 3.0 BETA might take a longer than earlier. 
    2. Contact your partner if you need more storage for data migration and backup.
  2. Take a back up of the data available on TallyPrime on AWS using the Computer and User Management portal.
    1. Download the backed-up data to your local computer. <link to the procedure for backup from portal>
  3. From the Computer and User Management portal, upgrade to the latest release – TallyPrime Release 3.0 BETA.
    Refer to Update to TallyPrime Releases for more details. 
  4. Start the latest release of TallyPrime on the virtual computer, select the company and migrate.
    On successful migration, you can continue using the company data as usual. 

Migrate data using local computer 

  1. Take a backup of the data available on TallyPrime on AWS using the Computer and User Management portal.
  2. Download the backed-up data to your local computer.
  3. Install the latest release of TallyPrime (TallyPrime Release 3.0 BETA) in the local computer and migrate the company data.
  4. On successful migration, upload the migrated company data to the virtual computer.
    Note: It is recommended to upload the migrated data into the Shared_data folder of your virtual machine. 
  5. From the Computer and User Management portal, upgrade to the latest release – TallyPrime Release 3.0 BETA.
    Refer to Update to TallyPrime Releases for more details.
  6. Start the latest release of TallyPrime on the virtual computer, select the migrated company data (6-digit company) > Enter, and continue to use the data as usual. 

 Contact your Partner for data migration 

  1. Take a back up of your company data using the Computer and User Management portal
  2. Download the backed up data to your local computer.
  3. Share the backed up data with your partner to get it migrated to the latest release of TallyPrime.
  4. On receiving the migrated data from your Partner, save it into your local computer, and upload it to the virtual computer.
  5. From the Computer and User Management portal, upgrade to the latest release – TallyPrime Release 3.0 BETA.
    Refer to Update to TallyPrime Releases for more details. 
  6. Start the latest release of TallyPrime on the virtual computer, select the migrated company data (6-digit company) > Enter, and continue to use the data as usual.
Note: TallyPrime on AWS does not support co-existence of different releases of TallyPrime on the virtual computer. After migration, in case you would want to continue to access the data using the the earlier release of TallyPrime, perform the following:
- From the Computer and User Management portal, select the applicable release (for example, TallyPrime Release 2.1).
- Access the 5-digit source company data, and continue to use the data as usual. 

Record your day-to-day transactions

Using TallyPrime on the virtual computer, you can record all your business transaction as per your requirements. The data gets saved based on the folder path you have set while creating the company.

  1. Press Alt+G (Go To) > Create Voucher > select the required voucher type, if needed, and record your transaction.
  2. Press Ctrl+P to print your voucher, as needed, by selecting the desired printer.
    Note: Whenever you print in TallyPrime, you will be redirected to the browser screen, where the printers you have connected locally will automatically appear under the Printer tab.
    You will not need to connect them manually again.

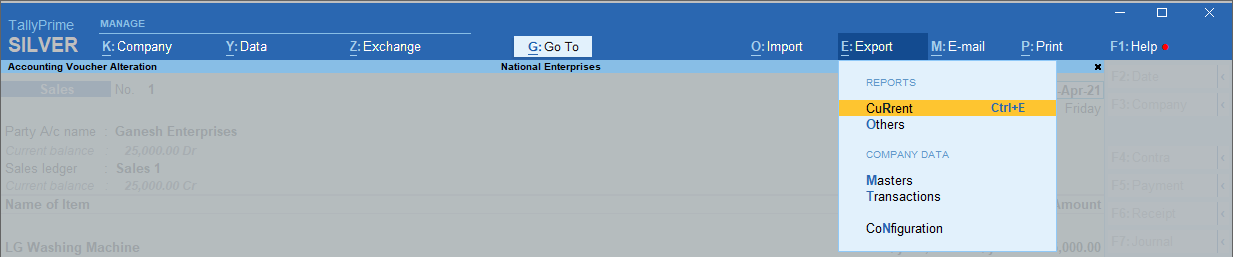
You can view your transactions in different reports in TallyPrime and export, e-mail, or print the reports, as needed.

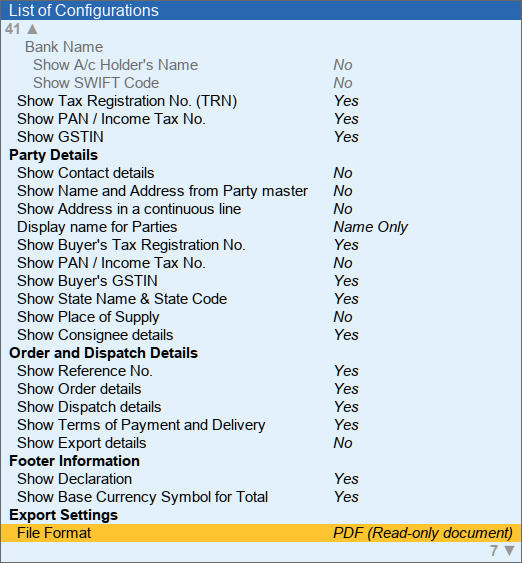
Note: Your virtual computer has LibreOffice application installed by default. In TallyPrime, when you export any report or voucher in Excel file format, the file will open in LibreOffice. 

Add Digital Signature to PDF Documents 

In your business, if you need to share your invoices or reports with stakeholders, auditors, or customers for different purposes, such as authentication records or audit. Similarly, you might be providing Form-16 to your employees with signature and stamp of your organization. Using digital signature in your documents will avoid the risk of tampering and ensure that the document is authentic.

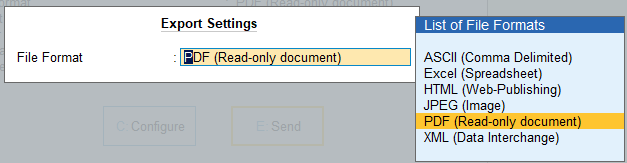
Digital signature can be added to the PDF format of any document. In TallyPrime on Virtual Computer, you can generate your invoices or reports and export, print, or e-mail a document in PDF format.

For illustration purpose, we will consider exporting the invoices or reports.

  1. From any voucher or report, press Ctrl+E to initiate Export. 
    Alternatively, click Export > Current
  2. Press F8 (File Format) and select PDF (Read-only document).

    Alternatively, press C (Configure) > File Format and select PDF (Read-only document).
  3. Press E (Send) to complete the export to PDF file format. 
  4. To view the exported PDF file, click Storage from top-left corner as shown below:
  5. My_Files > Export and select the PDF file to download in your local computer
  6. Open the PDF file in your PDF editor and digitally sign the document. Refer to the Sign a PDF section on the Adobe Acrobat site. 
    Note: As the use of a dongle for configuring Digital Signature is not supported in TallyPrime on Virtual Computer, adding the digital signature to the invoices or reports works similar to how you would digitally sign your PDF document in your local computer. 

Backup your data | Download from virtual computer to local computer

You may want to keep a copy of the files and folders on your local computer. To do so, you can use the Download feature to backup the selected files to your local computer.

  1. On the top-left corner of the virtual computer, click the Storage icon.
    The Files Storage window opens.
  2. Select the folder to browse to the location of the file that you want to download.
  3. Click the down arrow on the right of the file, under the Last Update column, and click Download.
    The file gets downloaded to the Desktop of your local computer.
    Note: Desktop of the local computer is the default path set when you download any files from the virtual computer. This path cannot be changed.

Whenever you upload or download your files, you will see an alert on the Notification icon on the top-right corner of the screen. You can click the notification icon to view the activities.

You can also backup the entire data from the virtual computer to the backup storage location allocated by Amazon, based on your plan. For more information, refer to the Self Service Portal topic. 

Disconnect the virtual computer

Once you are done with your work for the day, it is recommended to disconnect and shut down the virtual computer. Shutting down the computer when you are not using it optimises the overall cost and also avoids the hassle of leaving the computer unattended. 

  • Click the computer name that appears on the top-right corner, and select Disconnect.
Note: The virtual computer will get disconnected automatically if it remains idle for 45 minutes due to inactivity.

Next time you need to use your virtual computer, on the Virtual Computer Connection client, click Connect under the Action column. 

Additional Features to Effectively Use the Virtual Computer

Set up display resolution

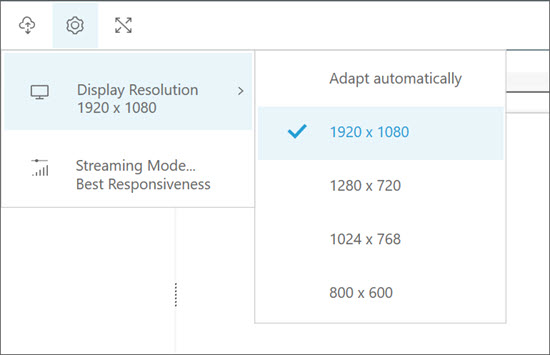
The resolution of the virtual computer adapts automatically based on the resolution of your local computer. If you are comfortable with a specific resolution of the screen:

  1. On the top-left corner of the virtual computer, click the Settings icon.
  2. Under Display Resolution, select the desired resolution. For example, select 1920 x 1080.
    The resolution of the display screen is set as selected.

View in full screen mode

While working on the virtual computer, you may want to view the screens in maximum window size. In that case, you can switch to the full-screen mode anytime.

  • On the top-left corner, click the Enter fullscreen icon.
  • To revert to the normal screen, hover your mouse around the top part, and click the Exit fullscreen icon. 

Capture a screenshot

At times, you may need to save the details displayed on a specific screen of your virtual computer for future use. On the virtual computer, you can take a screenshot of the same and save it at a convenient location on your local computer.

When you are on a screen that you want to capture

  1. Click the computer name appearing on the top-right corner and click Save a Screenshot.
  2. Select the location on your local computer and provide a file name to the screenshot
  3. Press Enter to save the image file.

Troubleshooting | Repair Data, Force Quit Application, & Restart Computer

Repair Company Data

If your company data is corrupt or you need to repair the data, you can run the zero command repair operation directly from the virtual computer.

  • On the bottom-left corner of the computer, click the Start icon, select Troubleshooting > Utilities > TallyPrime with Zero Command Repair.

This will start the TallyPrime application with the Zero Command Repair process to repair your data. For more information, refer to the Repair Data topic.

Force quit TallyPrime

While working on your virtual computer, if your application needs to be closed for any reason.

  • On the bottom-left corner of the computer, click the Start icon, select Troubleshooting > Utilities > Force Quit TallyPrime.

This will close TallyPrime. You can open TallyPrime again by double-clicking the TallyPrime icon from the desktop of your virtual computer.

Restart computer

You may need to restart the virtual computer at times to apply system updates, similar to the way you manage your personal computer. 

  • On the bottom-left corner of the computer, click the Start icon, select Troubleshooting > Restart Computer.

If you have opened any file or application with unsaved data, the computer will prompt you to save your data before restarting.

Shutdown Virtual Office

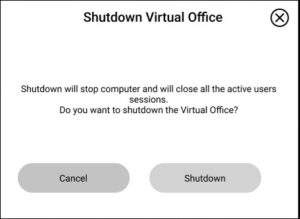
If you are an Administrator or an Owner, anytime you need to shutdown the Virtual Office, you can do so directly from the virtual computer. 

  1. In your virtual computer, on the bottom-left corner, click the Start icon > Help > Shutdown Office.
    Note: This menu will be available only for users with Administrator or Owner credentials for the virtual computer.

    The Shutdown Virtual Office message box appears prompting you to confirm the shutdown.
  2. Click Shutdown to shut down the Virtual Office.
    This shutdown will stop all virtual computers and close all the active user sessions.  

Change font size

While working on your virtual computer, if you want to adjust the font size of TallyPrime based on your comfort level.

  • On the bottom-left corner of the computer, click the Start icon, select Troubleshooting > Settings > Font Size > select the required box > click Save.

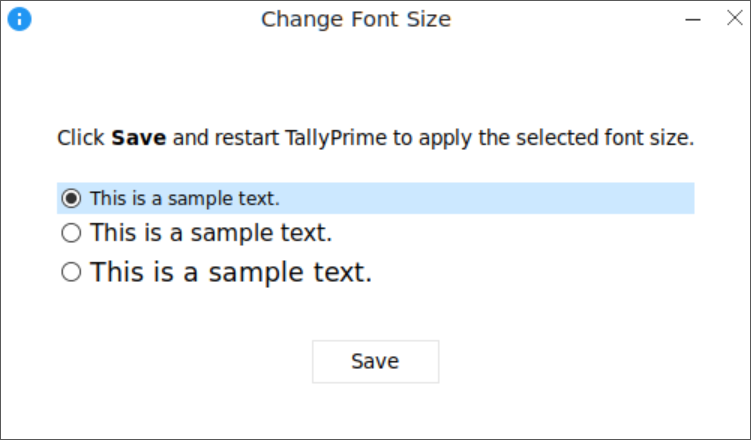
Once you restart TallyPrime, the changes will be applied and the font size of TallyPrime will be adjusted accordingly.

System Information

You can view the system and environment information of your virtual computer, such as the Computer Name, RAM, Storage capacity, TallyPrime release, OS version, and so on.

  • Click the Start icon, and select System Information. The following screen appears:

TallyPrime Features Not Supported in Release

Data sharing

  • Synchronisation over IP from TallyPrime in your local computer to the virtual computer is not supported.

Licensing & Upgrade

  • You can activate only one TallyPrime license in a connected virtual computer, unlike on your local computer where you can activate two different licenses on two instances of TallyPrime applications.
  • Upgrade to the latest release from TallyPrime on the virtual computer is not supported. You can update to the latest TallyPrime release or  with necessary administrator rights, from the Self Service Portal portal.
  • You cannot have multiple versions of TallyPrime co-existing in the virtual machine.  

Error resolution features

  • Repair and Re-install using TallyPrime Setup Manager is not supported on the virtual computer. Similarly, troubleshooting through command prompt is not supported in this release. However, you can repair your application using Start > Troubleshooting > TallyPrime with Zero Command.

Printing

  • While printing an invoice or a report, the Dot Matrix Format is not supported if you have selected a dot matrix or thermal printer. However, you can select Neat Mode and Quick/Draft Mode for the Dot Matrix printer.
  • While printing more than 100 pages of invoices and reports in pdf file format on a local printer, you may experience slow printing performance.
  • If you had selected the Print Layout as Landscape in your local printer, changing it to Portrait in the virtual computer prints the document in Landscape page layout. Similarly, changing the layout to Landscape in the virtual computer prints the document in Portrait layout.
  • You can print invoices and reports in two different ways on your system by configuring your printer settings.
    • In the Printer Settings, if you select local printer to print, the Virtual Computer Connection will automatically show you all the printers attached to your local computer.

      Click here to choose from the wide range of available paper sizes.
      All Redirected Printer’s Paper Size
      Letter
      A4
      A5
      A6
      ISO B5
      C5
      Com 10
      DL
      Eight Point 5*13
      Envelope C6
      Executive
      JIS B5
      JIS B6
      Legal
      Monarch
      16k
      Statement
      Thermal 2.2″ (56mm)
      Thermal 2.2″ (58mm)
      Thermal 2.8″ (72mm)
      Thermal 3.1″ (79mm)
      Thermal 3.1″ (80mm)
    • In the Printer Settings, if you select PDF to print, you will be presented with a list of additional supported paper sizes, regardless of what printer you are using.

      Click here to see the entire list of supported page sizes.
      PDF-Supported Paper Sizes
      11*14
      11*17
      13*19
      16*20
      16*24
      2A
      4A
      8*10
      8*12
      A0
      A1
      A2
      A3
      A4
      A5
      ANSI A
      ANSI B
      ANSI C
      ANSI D
      ANSI E
      Arch A
      Arch B
      Arch C
      Arch D
      Arch E
      C0
      C1
      C2
      C3
      C4
      C5
      Envelope #10
      Envelope C5
      Envelope DL
      Envelope Monarch
      Executive
      B0 (ISO)
      B1 (ISO)
      B2 (ISO)
      B3 (ISO)
      B4 (ISO)
      B5 (ISO)
      B0 (JIS)
      B1 (JIS)
      B2 (JIS)
      B3 (JIS)
      B4 (JIS)
      B5 (JIS)
      Ledger
      US Legal
      US Letter
      RA0
      RA1
      RA2
      RA3
      RA4
      SRA0
      SRA1
      SRA2
      SRA3
      SRA4
      Super A
      Super B
      Tabloid Extra
      Tabloid

Connectivity settings and customisation

  • TallyPrime application on the virtual computer does not support configuration for the proxy settings. 
  • The current release supports only TCP-based and TDL-based customisations.
  • If the customisation involves any external API, such customisations are not supported by default. You can contact Tally Solutions to enable the API to support the associated customisations. 
  • If you need any exe or DLL to be deployed with TallyPrime Application folder, such integrations/customisations are not supported.

TallyPrime Server Support

  • You will not be able to restrict use of TallyPrime Server through Username/Domain name or IP address. However, you can do it through the virtual computer name.