Access to business data on the move enables you to keep your data up-to-date and reliable. You may need to refer to your company data when you are away from your work location. Similarly, your business may require multiple users to update the same data. To meet such requirements, you will need to host your data and application in a location that is easily accessible from anywhere, anytime.
Manage your business on the go safely by connecting to a virtual computer through the Virtual Computer Connection client and also through the web browser from the Self Service portal that are available on the AWS infrastructure. Both the client and the Self Service portal enable you to use any local computer to connect to a virtual computer and use the TallyPrime application for your business.
Access your business data anywhere – Whether you are traveling or at a customer’s place, you can access company data from anywhere by connecting to a virtual computer. You can either install the client onto a local computer and then log in or use the Self Service portal to connect to the virtual computer via a web browser for accessing the TallyPrime application and data.
Virtual computer – By default, the virtual computer comes with all basic setup like pre-installed TallyPrime application, a set of pre – organised folders for your data and files, and other features that you might need to run your day-to-day work seamlessly.
Get started with TallyPrime on Virtual Computer – Connect to the virtual computer and access TallyPrime on the move. Setting up your TallyPrime license is a one-time activity. If you are a new user, activate your license. If you are an existing user, surrender your license from the local computer and reactivate the same on the virtual computer. Get started by creating your company in TallyPrime and record your transactions. Do you already have your company data locally? No worries! Upload TallyPrime or Tally.ERP 9 data on the computer in a few simple steps, access it using TallyPrime, and you are all set!
Troubleshoot and access other capabilities – While using the virtual computer, you can use common features like instantly capturing a screenshot, viewing notifications, or performing common troubleshooting activities. Additionally, restart the computer when you need, run the data repair process or even shutdown TallyPrime application, each of these with the click of an option from the Start menu.
To be able to access and work on your virtual computer, you will require the following:
Your virtual computer looks similar to any local computer, with TallyPrime preinstalled. A sample image is shown below:
It has the following components:
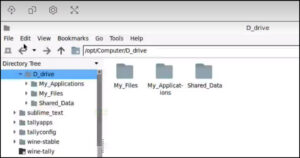
The virtual computer comes with a few pre-defined folders where you can keep your data and applications, in an organised manner. However, there is no restrictions on using the folders the way you want or creating new sub-folders. A sample image is shown below:
Using the Storage icon that appears on the top-left corner of the virtual computer, you can upload files and folders from your local computer to any of these folders.
Note: Be assured that uploading your business-critical data will be safe at a storage location attached to your virtual computer. You can also create new folders under any of these folders, if needed, and save your files in the new folder. However, any data stored other than these folders will get removed the next time you start the virtual computer.
TallyPrime on Virtual Computer has the flexibility to access the TallyPrime application from anywhere. All users of your Virtual Office would generally have access to the folders on the Virtual Computer. However, there may be situations that you as the Owner or Administrator have stored business-critical data inside the Shared_Data folder and you want to completely restrict other users from accessing such information. In some cases, you may have data that is required for data entry or your day-to-day business transactions and you want users to access such data only when they connect to the company through TallyPrime on the Virtual Computer. You now have the flexibility to set permissions for all such cases so that your data remains secure through authorised access.
As an Owner or Administrator, you can set the following permissions for the standard users in TallyPrime on AWS. Let’s consider Shared_Data folder for illustration purpose.
You can set the permissions for the Shared_Data folder and any subfolder created under it. However, the permission you set for the parent folder Shared_Data takes prominence. Let’s consider a few scenarios to understand the impact of setting permissions in a folder hierarchy. Say, under the Shared_Data folder, you have created two subfolders named Data_HO and Data_BLR.
|
Shared_Data (Parent Folder) |
Data_HO (Subfolder) |
Data_BLR (Subfolder) |
Description |
|---|---|---|---|
| Allowed | Allowed | Disallowed | In this case, the user can access Shared_Data and Data_HO, but cannot access Data_BLR. |
| Disallowed | Allowed in TallyPrime | Allowed |
As you have set the parent folder with Disallowed access, the user will not be able to access or download the data from Data_HO and Data_BLR even if the access is set to Allowed in TallyPrime and Allowed, respectively. |
| Allowed in TallyPrime | Allowed in TallyPrime | Disallowed | The user can access Shared_Data and Data_HO through the TallyPrime application but cannot access Data_BLR. |
In addition:
Select the required access for the Standard User, for example Allowed in TallyPrime.
For details about permissions, refer to the Types of Permissions for Folder Access section.
You can alter the permissions as needed for the Standard User. However, you cannot remove Standard User from the User list.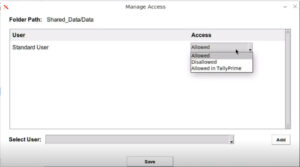
Say you have set Allowed in TallyPrime or Disallowed access for the Standard User. There are situations when you may want a specific user among the Standard User group to be able to access the folder completely, without any restrictions. In this case you can add that user and select the required Access.
In the Manage Access screen
The following errors may appear for users with Allowed in TallyPrime or Disallowed permission:
To manage your virtual computer better, you can use the following features as needed:
Additionally, the following troubleshooting operations are readily available from the Start menu of your virtual computer:
DCV: At times, you may want to know certain details about your virtual computer, such as the operating system of the client and server, or similar information.
The virtual computer provides you a seamless experience of maintaining your business transactions using the TallyPrime application. Connect to the computer and activate or reactivate your license on TallyPrime, which is a one-time activity. Once you activate/reactivate the license, you can use TallyPrime for your business needs. You can organise your data and other files, as per your convenience.
You can connect to one or more virtual computers through the Virtual Computer Connection client from your local computer. To know how to install the Virtual Computer Connection, refer to the Virtual Computer Connection topic.
Alternatively, you can also access the virtual computer through a web browser from the Self Service portal without having to install a client on your system and use TallyPrime. For more information about connecting to the virtual computer through the portal, refer to the Self Service Portal topic.
For more information, refer to the Virtual Computer Connection topic.
Disconnect your computer using the client or close the virtual computer window, when you are away. If your virtual computer is idle for 45 minutes due to inactivity, it will automatically disconnect. You can connect back and continue with your work when required.
Once you connect to the virtual computer for your account, activate your license on TallyPrime, create a company, and get started.
To know more about TallyPrime and its features, refer to the following topics:
To know more about TallyPrime Server and its features, refer to:
To start using TallyPrime, you will need to surrender your license on the local computer and reactive the same on the virtual computer.
Note: If you have uploaded TallyPrime data, you can use the data as is. However, if you have uploaded Tally.ERP 9 data, you will need to migrate the data to TallyPrime. For more information, refer to Data Migration.
To know more about licensing in TallyPrime, refer to the Licensing Activities topic.
TallyPrime Release 3.0 comes with a host of features for you to meet your specific business requirements. You can seamlessly migrate your existing content to the latest release of TallyPrime.
For a seamless migration experience, refer to the Recommendations before Data Migration.
You can migrate your company data in any of the following ways:
Note: TallyPrime on AWS does not support co-existence of different releases of TallyPrime on the virtual computer. After migration, in case you would want to continue to access the data using the the earlier release of TallyPrime, perform the following:
- From the Computer and User Management portal, select the applicable release (for example, TallyPrime Release 2.1).
- Access the 5-digit source company data, and continue to use the data as usual.
Using TallyPrime on the virtual computer, you can record all your business transaction as per your requirements. The data gets saved based on the folder path you have set while creating the company.
Note: Whenever you print in TallyPrime, you will be redirected to the browser screen, where the printers you have connected locally will automatically appear under the Printer tab.
You will not need to connect them manually again.
You can view your transactions in different reports in TallyPrime and export, e-mail, or print the reports, as needed.
Note: Your virtual computer has LibreOffice application installed by default. In TallyPrime, when you export any report or voucher in Excel file format, the file will open in LibreOffice.
In your business, if you need to share your invoices or reports with stakeholders, auditors, or customers for different purposes, such as authentication records or audit. Similarly, you might be providing Form-16 to your employees with signature and stamp of your organization. Using digital signature in your documents will avoid the risk of tampering and ensure that the document is authentic.
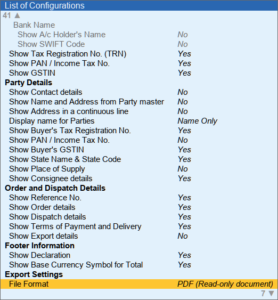
Digital signature can be added to the PDF format of any document. In TallyPrime on Virtual Computer, you can generate your invoices or reports and export, print, or e-mail a document in PDF format.
For illustration purpose, we will consider exporting the invoices or reports.



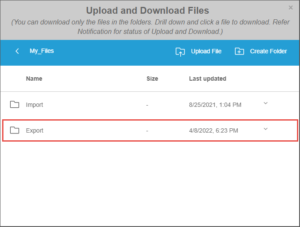
You may want to keep a copy of the files and folders on your local computer. To do so, you can use the Download feature to backup the selected files to your local computer.
Note: Desktop of the local computer is the default path set when you download any files from the virtual computer. This path cannot be changed.
Whenever you upload or download your files, you will see an alert on the Notification icon on the top-right corner of the screen. You can click the notification icon to view the activities.
You can also backup the entire data from the virtual computer to the backup storage location allocated by Amazon, based on your plan. For more information, refer to the Self Service Portal topic.
Once you are done with your work for the day, it is recommended to disconnect and shut down the virtual computer. Shutting down the computer when you are not using it optimises the overall cost and also avoids the hassle of leaving the computer unattended.
Note: The virtual computer will get disconnected automatically if it remains idle for 45 minutes due to inactivity.
Next time you need to use your virtual computer, on the Virtual Computer Connection client, click Connect under the Action column.
Ever needed to print specific invoices, reports, or other documents like custom reports, labels, etc. that don’t fit standard paper sizes? Custom paper sizes let you tailor your printing setup to match your exact needs, ensuring every document looks professional and perfectly formatted. With TallyPrime on AWS, you can now easily add, edit, and delete user-defined paper sizes right from your Virtual Office. The Default Paper Size cannot be edited or deleted. Remember to restart your Virtual Office from the Self-Service Portal after making any changes to the custom paper sizes. Only then, the changes will be reflected for all users in TallyPrime.
Prerequisites for using this feature:
Whether you’re an Owner or Administrator, managing these configurations is straightforward and designed to enhance your printing capabilities. From financial reports to shipping labels, user-defined paper sizes ensure accuracy and efficiency in your day-to-day operations.
Say you need to print a customised report with specific paper dimensions, such as Stock Summary report on paper sized at 8 inches (203.20 mm) width and 10 inches (254.00 mm) height. You have the option to define a custom paper size tailored to your business needs. You must be either an Owner or an Administrator to be able to add the custom paper size in your Virtual Office.

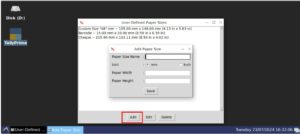
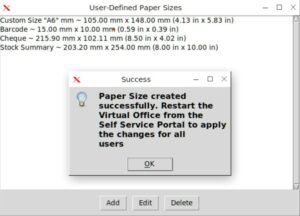
The paper size will get listed in User-Defined Paper Sizes screen. Similarly, you can add multiple paper sizes at once.
Now, if you need to print the Stock Summary report using the newly added paper size, you can configure printer settings to effectively use custom paper sizes within your Virtual Office using TallyPrime.
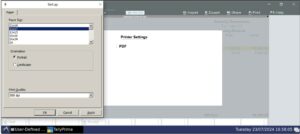
The document will be printed as per the selected paper size.
You may want to edit the height and width of the paper size to 10 inches width and 12 inches height. You can edit only the user-defined paper sizes.
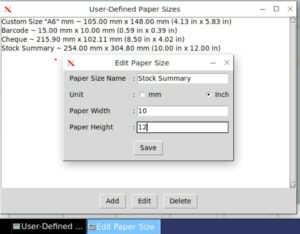
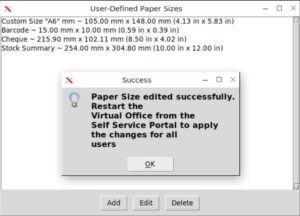
Similarly, you can edit multiple paper sizes at once.
You may have ended up creating multiple paper sizes and wish to delete a paper size permanently. You can delete only the user-defined paper sizes.
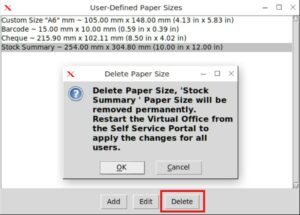
The selected paper size will be deleted permanently from the list of paper sizes in your Virtual Office.
So, with TallyPrime’s new Custom Paper Size feature on AWS, you can now fine-tune your printing exactly as per your business needs. Whether it’s for invoices, reports, or any specialized document, you’ve got the customisations to ensure every printout looks just right.
The resolution of the virtual computer adapts automatically based on the resolution of your local computer. If you are comfortable with a specific resolution of the screen:
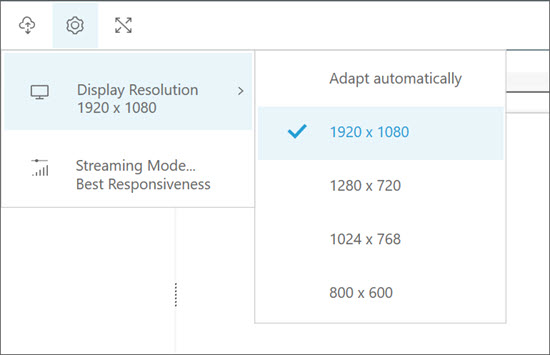
While working on the virtual computer, you may want to view the screens in maximum window size. In that case, you can switch to the full-screen mode anytime.
At times, you may need to save the details displayed on a specific screen of your virtual computer for future use. On the virtual computer, you can take a screenshot of the same and save it at a convenient location on your local computer.
When you are on a screen that you want to capture
If your company data is corrupt or you need to repair the data, you can run the zero command repair operation directly from the virtual computer.
This will start the TallyPrime application with the Zero Command Repair process to repair your data. For more information, refer to the Repair Data topic.
While working on your virtual computer, if your application needs to be closed for any reason.
This will close TallyPrime. You can open TallyPrime again by double-clicking the TallyPrime icon from the desktop of your virtual computer.
You may need to restart the virtual computer at times to apply system updates, similar to the way you manage your personal computer.
If you have opened any file or application with unsaved data, the computer will prompt you to save your data before restarting.
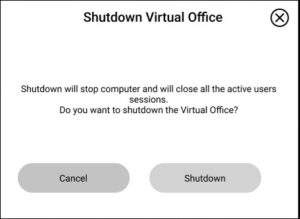
If you are an Administrator or an Owner, anytime you need to shutdown the Virtual Office, you can do so directly from the virtual computer.
Note: This menu will be available only for users with Administrator or Owner credentials for the virtual computer.
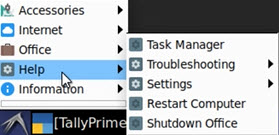
While working on your virtual computer, if you want to adjust the font size of TallyPrime based on your comfort level.
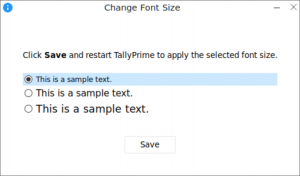
Once you restart TallyPrime, the changes will be applied and the font size of TallyPrime will be adjusted accordingly.
You can view the system and environment information of your virtual computer, such as the Computer Name, RAM, Storage capacity, TallyPrime release, OS version, and so on.
In the Printer Settings, if you select local printer to print, the Virtual Computer Connection will automatically show you all the printers attached to your local computer.
| All Redirected Printer’s Paper Size |
| Letter |
| A4 |
| A5 |
| A6 |
| ISO B5 |
| C5 |
| Com 10 |
| DL |
| Eight Point 5*13 |
| Envelope C6 |
| Executive |
| JIS B5 |
| JIS B6 |
| Legal |
| Monarch |
| 16k |
| Statement |
| Thermal 2.2″ (56mm) |
| Thermal 2.2″ (58mm) |
| Thermal 2.8″ (72mm) |
| Thermal 3.1″ (79mm) |
| Thermal 3.1″ (80mm) |

| PDF-Supported Paper Sizes |
| 11*14 |
| 11*17 |
| 13*19 |
| 16*20 |
| 16*24 |
| 2A |
| 4A |
| 8*10 |
| 8*12 |
| A0 |
| A1 |
| A2 |
| A3 |
| A4 |
| A5 |
| ANSI A |
| ANSI B |
| ANSI C |
| ANSI D |
| ANSI E |
| Arch A |
| Arch B |
| Arch C |
| Arch D |
| Arch E |
| C0 |
| C1 |
| C2 |
| C3 |
| C4 |
| C5 |
| Envelope #10 |
| Envelope C5 |
| Envelope DL |
| Envelope Monarch |
| Executive |
| B0 (ISO) |
| B1 (ISO) |
| B2 (ISO) |
| B3 (ISO) |
| B4 (ISO) |
| B5 (ISO) |
| B0 (JIS) |
| B1 (JIS) |
| B2 (JIS) |
| B3 (JIS) |
| B4 (JIS) |
| B5 (JIS) |
| Ledger |
| US Legal |
| US Letter |
| RA0 |
| RA1 |
| RA2 |
| RA3 |
| RA4 |
| SRA0 |
| SRA1 |
| SRA2 |
| SRA3 |
| SRA4 |
| Super A |
| Super B |
| Tabloid Extra |
| Tabloid |

Revolutionising Finance : The Power of Nivi Ai

Virtual Computer Reports